Wednesday, November 25, 2009

Engine hatch lock

The engine hatch on my doka did not have a locking latch. The easiest solution was to pick up a second hand latch from a late model bus and then re-key the lock. I found a late model bus lock for 10 dollars via The Samba and then ordered a matching "R" key from a supplier on Ebay. The locks are still available new but at close to $100 for the same thing, I figure doing my own is the way to go.

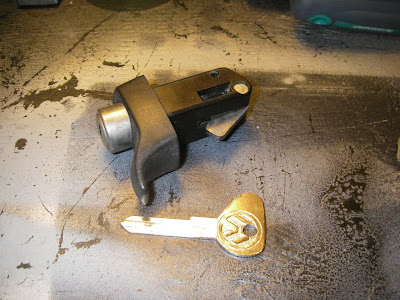
The lock will require re-keying but will be a very simple procedure. Here is the lock. I'll put up pictures of the re-keying a bit later.
The key blank is the R profile which is a match for a late bus (to 1979) engine hatch lock. Available off ebay.


The cylinder after removal from the barrel. I've removed one of the wafers and so one of the springs can be seen in the slot the wafer came out of. The other wafers can also be seen. It is these protruding wafers that prevent the cylinder from turning within the barrel and thus locking it.

Re-keying the lock will simply be a matter of switching the wafers around after the key has been cut. I'll cut the key to a random pattern then switch and remove some of the wafers as necessary so that none of them will be protruding when the key is inserted.


Above/below: the lock with the retaining screw removed. With it out it is now possible to remove the cylinder from the barrel.


Monday, November 9, 2009

Aircare Passed


The smallest achievments sometimes give the greatest satisfaction. Some decent numbers; not too bad for a vehicle that used to smell like a refinery whenever the engine was running. One friend had compared it to a Mexican taxi.

Monday, September 28, 2009

New Fuel Rails


Today after a quick trip the Princess Auto, about 20 bucks and 10 minutes of work, I have two new virtually indestructible fuel rails to replace the original plastic parts.

To assemble the replacements, I used a couple of anodized aluminium compressed air manifolds, four brass barbed fittings and a plug. I may eventually add a pressure gauge to show fuel pressure.
With the addition of these new parts, there is now no part of the fuel system, with the exception of the tank and filler, that I have not replaced. I'm hoping this will banish Hephaestus.

Saturday, July 25, 2009

Friday, July 24, 2009

Work to Date

NOT my engine, but I wanted to put this up anyways. This is how it looks when it's really done right. Neighbour and VW guru Kobylan (see The Samba) did this one in an 86 Westy. In the process, creating a minor spike in the trading price of zinc.

I thought I'd better list out the work I've done on the truck up to this time. The project is quite a bit older than this blog and so to catch up things up I'll include a summary of the work I've done.


1) The engine tune and engine bay clean-up. Including painting of bay, alternator, water pump, distributor, and powdercoating of coolant crossover pipe. Replacement of all metal coolant pipes and some rubber hoses. All clamps replaced with stainless. New filters, distributor cap, rotor, spark plugs and wires. Throttle body throat recontoured, idle switch repaired and shaft shimmed. New temp sensors and oil pressure senders, ground strap, and belt. Stainless hardware where possible. New Oil pump, 5W50 Synthetic added. New engine mounts. Fuel pump isolators changed, fuel pump brackets sanded and rust-painted. Fuel lines changed and all new fuel line clamps and injector seals. New intake manifold boots, clamps, gaskets and runners painted. Zinc plated coolant tank bracket installed (thanks, Doug). Replacement ECU from donor van. Main alternator to battery lead had chafed through and so was replaced.

2) All new engine tin primed and painted with caliper paint

3) Muffler heatshield sanded, primed and painted with caliper paint. Muffler straps replaced. Catalytic converter with 02 sensor welded on.

4) All new CVs, boots and axles in rear

5) Replacement of drivers side floor pan and sheet metal repair in driver's side wheel arch area

(Gotta love 3M autbody panel adhesive)

6) Replacement of fabricated bumpers with OEM rear and aftermarket front from donor van. Bumpers POR 15 on inside face and then spray rockerguarded to prevent corrosion. Bumper mounts powdercoated. Wetsanding, then polishing of rubber bumper strips. Bumper paint on all bumper end caps and replacement with all new mounting hardware. Removal, stripping and rockerguard spray on spare wheel carrier. Turn signal and license plate light contacts rust-removal and painted.

7) Removal of pinstripes and painting of radiator grilles, stripping and painting of windshield wiper arms. Temporary replacement hubcaps from donor van. Rust repair with body filler on rear valence finished with rockerguard spray. Some minor dent removal. Removal of passenger treasure chest door for hinge repair (blog entry to follow).

6) Syncro skid plate and driveshaft rails removed, sanded, POR 15 and rockerguard sprayed. Stainless hardware

8) Transmission fluid replaced with Redline MT80

9) Some POR 15 in interior of cab (next blog post)
Engine Clean-up

Engine bay with rockerguard on door, throughout interior and OEM bumper in place. Rubber matting is visible on the far side of the bay behind the wheel arch. (I'll be adding some photos of this side project in the future)


The engine bay after cleaning...a bit better


The engine bay before clean-up. Some accessories have already been removed. (Also note the heavy fabricated bumper the previous owner had installed; it's now been replaced with an OEM bumper from the 86 parts Vanagon)
The entire engine bay has been treated to a clean-up and painting. All hoses have been removed, inspected, cleaned, and replaced as necessary. All hoses were reinstalled with stainless hose clamps; the original clamps were very rusty.

In addition, the fuel injection system was redone. On it, all high pressure lines have been replaced and new clamps added.

The intake runners were cleaned and painted, as were all metal components with the exception of the fuel pressure valve (which is bugging me and will get done eventually).

The entire engine bay was sanded, treated with POR-15, then sprayed with paintable rockerguard. Heavy rubber matting was used to blank off behind wheel arches where the original paper dividers had been.

Engine Tune

Very worn throat and valve, valve is being held up out of the groove it has worn.

Cleaned and ready for rebuild. Two stainless washers were added on top of the body on the shaft to prevent the valve from cutting into the throat again. After cleaning, the rubber gasket visible in the first photo required trimming with an Xacto on its crown to allow the washers to rest on the body.


When I picked the truck up from the previous owner, one of the first things it needed was an engine tune and the reinstallation of the emissions controls. The idle control valve had been disconnected and it soon became apparant why it had. When reconnected, the idle went to approx 2000 rpm. A quick examination of the throttle body revealed that the idle adjusment screw was as far in as it could be and a couple of sensors had been disconnected.
I've now welded in an aftermarket catalytic converter with O2 sensor, replaced a defective T2 sensor and defective thermostat, and rebuilt the very worn throttle body.
The throttle body had a pretty big groove cut in the lower portion of the throat where the butterfly valve had been rubbing for years. This had allowed the valve to settle into the groove and opened up a large gap at the top. A couple of stainless washers on the top of the TB to support the valve, some JB weld in the throat (along with wiring repair of the throttle switch) and the throttle body is back in business.
When the engine was restarted, things were back to normal with the exception of a lack of ignition advance at around 2000 rpm. A swap of ECUs from my parts vanagon fixed that.

I'd originally bought my 86 parts van for the engine, transmission and syncro drivetrain, but things like the ECU will prove invaluable. At $1400 to $2200 for a new ECU, the $1600 I spent on the 86 syncro (which I'm still able to drive!) seems like a bargain.

Thursday, July 23, 2009

88 Volkswagen Double Cab


I'm starting a basic blog to record the work I'm doing on an 88 VW Syncro Double Cab (Doka). The truck is on its second engine and is essentially stock. When built, it was sold new with the optional rear differential lock, but other than that is very utilitarian, with manual steering and no air conditioning.

To date, I've done a bit of work since buying the truck in Nov of 2008 in Campbell River, on Vancouver Island, BC, Canada. I'm the second owner of the truck and it was well used by the previous owner who was a logger. General maintenance had been kept up but the truck has started to show its years. My plan is to revitalize it with bodywork, paint and any mechanical work that it may require.
I've now got 3 Vanagon variants. The first is an 83.5 Westfalia, the second is the Doka in this blog, and now an 86 Syncro Vanagon that I've purchased for spares and parts for the Doka.